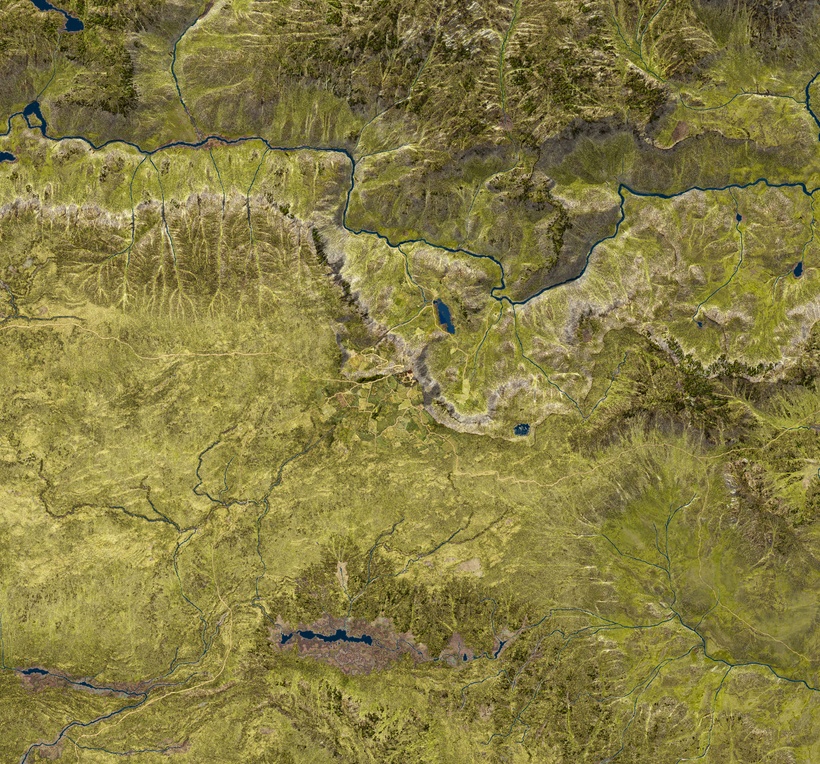
Here comes a look at how to create realistic lakes and rivers detailed enough to match the high resolution of 5 ft per pixel that is the target for this series of maps. World Machine does an admirable job of naturally eroding the landscape to create a realistic large area drainage and then also add lakes as well. The problem is that it creates rivers and lakes everywhere that can possibly form, and they look a bit stilted at this high resolution, so a bit of manual artistic touch up is needed.
Below is first a top down views of the terrain with all the WM lakes and rivers in blue, and then the second image with my edited layer on top in lighter blue.


To make the export of the final mask easy I create a new layer, make it solid white and give it a mask that I can use black or white which makes all my adjustments non-destructive. A color overlay makes them easy to see and mean I can adjust visibility while working and keep mask functionally intact. A solid black layer underneath an turn off color overlay and the mask is ready to be exported.

I save it as a TIFF or PNG file which WM prefers for masks. Import it back into WM again using a File input device, and it is easy to place it if you have the same extent active as you used for the export, just click the "Place in Current View" button will get it right. And now we have the adjusted lakes and river system in World Machine. Note that this is only a test, so I have not done all the lakes and rivers, far from it. I need to spend another day or so getting the whole 16K area done. The first areas while take a lot of extra time learning a creating the right brush setting, but effectiveness will come with experience, so future areas will be done much faster. the type of terrain also plays a large role, some areas have a lot of lakes and rivers, and some might even be so water-rich that they fill out almost every possible area and little adjustment is needed.
Below is how it looks in WM using the newly created mask.

Next up after this step is to take this primitive elevation coloring and create realistic texturing and all the data needed for further enhancement in Photoshop, QGIS and Unreal.
Thank you all for your support, it is literary a lifeline for me!! 🙂

Time for the next installment in my series in how to map the World of Greyhawk, all over again. My last post was about how to use fractals to create the shape of the terrain, now its time to lift the perspective and look at the big picture. How to build the world, one piece at at time.
Even the best of computers cannot recreate a whole virtual world full of details and color in one go, it is like eating an elephant, it has to be done one piece at a time. Add the quirkiness of terrain generation tools to the mix and it requires you to be both careful and daring, and to plan how you do it. It has taken me years to figure out how to do it, trial an error and learning from others attempts. This says as much about my intelligence as it does about the difficulty in doing this, I don't advice anyone to do this unless they are VERY passionate and possess a large potion of stubbornness, if that is the case you should definitely do this. You will have something to occupy you for a very long time 🙂
When you have fiddled around with the fractals and have created a bit of terrain that looks perfect, as a world cartographer like me you get fond of it and want to save it and shift focus a bit and add more carefully shaped terrain next to it. This is where one of the many quirks of CG terrain creation tools come in to play, when you shift focus ever so slightly the results change. The same happens when you look at things close up or further away, and I find it VERY annoying and it took me along time to learn to live with it and figure out how to work around it.
The way I have decided to deal with this problem is to first calculate how large of an area you can render at your desired resolution. The desired final resolution is 5ft, and the maximum render resolution is 16K (16,384 px). So a 16K map @5ft per pixel is 81,920 ft which is 15.51515151515152 miles. This is not rocket science and no real creatures are going to get hurt, so lets round it off to one decimal 15.5 miles. Hopefully it will be possible to work with bigger renders in the future, but right now this is the size we have to work with. there is an option of using tiles to cover larger areas in single render. It comes with its own set of problems so I'm going to avoid using it if possible, but it is an option that is good to keep in mind, and I'm also recommending to use a workflow that retain that option. This is another reason I decided to split terrain generation from the water creation and texturing.

Rendering of an 16K area take my now venerable 8 core Intel workstation around 6 hours or so for the height map alone. So if you don't have one of those new 32 or 64 core Threadripper monsters, I recommend to have a separate computer that can crunch in the background while you can work on other things. Overnight I often set both computers to render to speeding up things. The result of the render needs to be exported into some sort of file and stored for suture use. The only thing needed from this fist stage is the elevation data in the form of an height map. An heightmap is just an greyscale image with the higher areas being indicated by brighter and brighter grey. Any type if bitmap format that can handle greyscale images can be used, the key issue is the bit rate which is effectively the vertical resolution. Most images we take with our phones or see on the web are 8-bit, which is great for Minecraft like terrain but for detailed real world like mapping we need way more so its 16-bit minimum and preferable 32-bit. The files get significantly bigger with each increase but it is necessary to keep our options open. World Machine has a built in 32-bit native format that saves the date as a WM Library, the downside to this is that the data can only be used back in world Machine again, but at this stage that is not a big problem. The huge bonus is that the date is geo-located, so when it is imported back into a new WM project the it knows its place. This saves a lot of note taking and keeps the precision really high.
Importing the saved WM library file makes the next CG terrain quirk apparent, raised edges. When you render an area the center bits match each other almost perfectly but the edges stick up and need to be masked off manually by using a set of Layout Generators like this:

It is a bit of a fiddly nuisance at times, but with a bit of blur here and there added the result are usually more than acceptable. Now we have a ready rendered area to add to that are fixed so no nasty fractal surprises and to look at it in high resolution is much faster since all the hard work calculating fractals and erosion are already done. By using WM Library devices and keeping the exact same settings for the guide map, working on areas using different WM project files becomes possible without sacrificing quality. Instead of using a huge WM file with a large amount of terrain recipes in order to create everything from arctic mountains carved out from glacial ice to wind eroded deserts landscapes in single file, we can now use lots of file instead and export an import between them. The drawback is that you have to render at the full resolution at all times. I have tested use a master terrain rendered at lower resolution that covers the whole area first, and then scale it up to add detail but found it lacking in variation. Even at lower resolution you need to have a huge variation to create a believable landscape covering an area as large as the Flanaess, and a fantasy world should look even more impressive in places. This require fractal combinations in the hundreds, with as many different erosion variants and settings as well.
The first job is to be artistic and first try out different fractal combinations together with filters and different erosion settings, then you need to play around using Layout Generators to create the landscape you need. Then comes the tedious rendering, exporting and then import back the results and mask the ugly overlapping bits. Water is next, to map out the areas that can become lakes and rivers, and create the ocean surface or in this case the surface of the mighty Nyr Dyv. Fir this WM comes with a built in Create Water device, and as you can see in the screenshot below, it is not fully compatible with tiled builds. Lots of nifty and handy devices comes with this limitation which so try and use a non tiled approach if possible when you are using World Machine.

Next is a very time saving follow up device with a cryptic name of Composite Type, it is one of the hidden gems in WM. Another user pointed it out to me when I complained to have to fill in all the lakes manually. The Composite Type Device will do this automatically for you, and it will also give you a depth map, which is great for texturing which I will cover in a post coming soon. The Create water and its ability to generate a complete and believable natural looking lake and river system is a godsend and one of the major reasons I'm using WM, no other tool does this, this well yet. The catch, and there always is a catch in CG terrain work, is that you always get a maxed out set of lakes and rivers. In some areas that are rain drenched and relatively you genealogically speaking, this works great. Most areas though comes with a bit less rainfall and lakes have over time partially of fully filled up creating marshlands bogs or flat solid land instead of the lake that once filled the valley. Rivers carve out a deep valley but then are reduced to a lesser flow that meanders thought the old river depression. This requires new set of render, export, artistic intervention using Photoshop and then import back into World Machine again. It is tedious work but actually rather relaxing and fulfilling, it is hands on world building without waits for renders. It will also be the topic for a post in the series on how to map the World of Greyhawk coming very soon.

This was the post I was planning to post first today then the Ritersmarche area update got ready early and I posted that one first. First let me say welcome to all the new patreon members, thank you so much for making this possible!!! 🙂 The Greyhawk 2.0 project is experiences both setbacks and successes, it is one step back and two steps forward. I was hoping to use the new World Machine 4, but that seems to be a bit premature. One of the key features for me is to have overview, when you map large areas you need to have an idea of what this look like on a larger scale. This has always been where World Machine stood out against the competition. In the latest version emphasis have shifted more towards better view of the area in focus losing some of that overview. This is probably something that most artists and game developers like, but a problem for me. Thankfully the old version is still here, and I can have both installed side by side and use the best of both, and with a few updates WM4 might be as good as WM3 in this regard.
The image above shows how much of the world I've mapped at the first stage so far. From the Critwall peninsula and Scragholm Island in the foreground to the former Shield Land coast all the way past Axeport to Battledown in the east. The vertical coverage from - 1 km (0.6 miles) to 10 km (6.2 miles) with 32bit which means enough resolution to make it all smooth where that is needed and sharp when that is needed.
There are more water in this stage than it will be in the final version, especially lakes and rivers. The texturing at this stage show all the areas that CAN be lakes, rivers and other wetlands as blue. I will mask that down to a more reasonable level at the next stage, converting some of the blue areas to marchland or just flat land areas. This process will mostly be artistic and done manually in photoshop and then re imported into World Machine to feed the next step. This first step is mainly about terrain building, so lets take a closer look at how that is done.
Most computer generated terrain generated using fractals, and World Machine comes with three different fractals generators Basic Noise, Advanced Perlin and Voronoi. The first two are both perlin generators but with different ways to do the settings.

Here are an example of a Basic Noise output

and output from an Advanced Perlin generator

Perlin noise is great for creating all that under-laying fluctuations in landscapes, especially lowlands and the variations of large areas that are only visible against the horizon or from a high vantage point. These minute variations in landscape elevation forms the basis for lakes and rivers and how water flows across continents, and this is one of the main base data for texturing so even if it is hard to see the differences, the play a huge role later in the process.
Voronoi is a bit different, it created various forms of angular patterns in the forms of triangles or squares, sometimes very pure or broken up into intricate patterns. Voronoi can be used for a range of things from forming the base for large massive mountains to the pattern of farming fields around a village and even a random placements of houses in a city.

Fractals are rarely used in simple and pure forms, it is when you blend and tweak them the magic starts happening. You can blend data from tow generators using a Combiner, ad the data can be added, subtracted, multiplied or mixed in over ten different ways. Photoshop users recognize that this is just like layers of pixels can be blended in images, it is all the same type of manipulation of data.
Below is an example of how I have set it up in WM, this is a simple setup using a single Advanced Perlin generator. Fractals look repetitive over larger areas which in usually not the case in nature, so that need to be fixed. Large area variation is created by introducing distortion, which is created using a Distortion Generator. To make it more complicated the Distortion Generator needs to be given a pattern for the distortion and for that I've used two additional Advanced Perlin Generators one for the N-S (X) axis, and one for the E-W (Y) axis. WM works using gray-scale heightmaps so Z axis is not needed.

The generated fractal data is then fed into a Flow Restructure device, which makes sure all the valleys are flowing downhill creating realistic drainage. This device is a godsend but a late comer to WM, and if you look at all my maps so far they are not realistic in this regard. Thanks to this nifty device and its companion device Create Water it is now possible to create realistic lakes and rivers automatically. The data is then sent to an Erosion device and then a Clamp device to reduce it to form lowlands. Erosion is huge rabbit hole that needs to be looked at specially, so I'm going to skip over it today.
The green device labeled TER1 at the bottom of the group is a Layout Generator that let you create vector masks telling WM exactly where and how much you want this terrain to cover. A Blur Device smooth out the edges of the vector masks to make them blend in a bit more, and then a combiner with the Max blend mode integrate the data into the rest of the terrain.
More complicated versions of this uses two or more chains like this blended together in various ways.
You can learn my by watching my introduction to World Machine YouTube videos: (56) Anna Meyer - YouTube or even better resources can be found here: https://www.world-machine.com/resources.php?page=tutorials
Here comes an small update that have been on my to do list a long time, make the Rittersmarche area to better match WGQ1 Patriots of Ulek.
Changed the Jewel river to flow a bit more easterly further into the Suss. The town of Riddlings pass is now moved to the foothills west of Rittersmarche, and the foothills themselves have been moved west creating a larger grassy plain area between the Suss and the southern Lortmils.
The Suel Temple ruins had to be moved east to stay on the Suss side of the Jewel. I think that the new location near the Troll Creek and the Suss fens are even more appropriate.
Oakenburgh and Brenfluss now have the town symbols to reflect their true sizes.
All these changes will be on the 2021 map update.
A large thanks to Vincent Mattelaer for helping me research this area!
What do you do when you have accomplished something? You start all over again, this time with the goal of doing it better! So with twenty years of experience and technology progression I'm setting out to map the World of Greyhawk again, and this time in much better detail, from a mile to a few feet. This post is a first look into how I have decided to try and go about doing it.
Twenty years ago the main tool I used was Bryce 3 from DAZ Software, which was the coolest thing in the mid to late 1990's. This time I have decided to use World Machine 4 as the main tool for terrain creation, you can find out more about it here: http://www.world-machine.com
WM is uses a visual node based approach to creating instead of text based coding, which is what I need suffering from a mild dyslexia, but very good visual analytic perception. The key to understanding WM and similar tools is to see them as data manipulators. How that works in practice I tried to explain in a series of WM videos you can find here: Anna Meyer - YouTube.
The goal this time is to create a virtual model of the Flanaess and potentially the whole planet of Oerth at a resolution of 5ft. This model will include elevation, texture and auxiliary data like coastline maska, biomes and more. In parallel create "in game" handout maps as well, but more about them in future posts. For now I'm going to concentrate on setting up the workflow. World Machine will be the hub and main tool for terrain creation and texturing. I will use additional tools like Gea, Vue, Terragen, Blender and probably a few others to create certain features. This is going to be needed to ensure enough variety, which is one of the key aspects of believable virtual terrain creation. Nature look alike but never exactly the same, so in order to cover millions of square miles a large number of fractal combinations will be needed.

The first problem to tackle is the size. Virtual terrains are mostly used in computer games and as a backdrop for movies or as a ground for architectural virtualization, but this project is a on a vastly large scale. The Flanaess map covers 6000 miles West to East, and with 5 feet resolution that means 158,400,00 pixels across! We need to move to 128-bit computing to handle images of that size in one go, so it needs to be done in parts. In WM that can be done using tiling or re-import areas to work on adjacent parts. I think both approaches will be needed since they both have pro's and cons, tiling makes consistency of rivers and the terrain over larges areas easier but you can only really see the result with the final render. WM can render 16K which means 16384 pixels in a single render. This is mostly due to memory limitations, which means you get a reasonably detailed view up to 125 miles. With tiling you can render up to 64K which makes means you can cover huge areas in one go. This will be handy when you have large areas when you don't need to closely match exiting maps, but want to have all the detail. With more RAM both can hopefully be increased and the accuracy of previews will hopefully increase as well in future versions of my tools.
My plan is yo get a new Threadripper workstation later this year with 256GB of ram a really fast SSD array and a beefy GPU. This will both speed up render times by a factor of ten, and make it possible to work on 32K or even 64K in one go. In a few years with even faster computing and GPU's number crunching it might be possible to render 128K in a few hours. I made the same bet on Moore's law 20 years ago, and I think it is safe to make the same bet again this time. The Flanaess is withing reach in five or so years ad the planet within 10!
At first I tried to create everything, elevation, textures and the other data in a single pass. After years of struggling I now know that it is better to do it in stages. First a terrain base at roughly half the resolution to get coastlines hills, lakes and rivers in the right place and export that. Then merge the renders in a new file, detail the terrain with little things like boulders, cracks, wear and tear. Then render that again at the final resolution together with masks and textures. Since the underlying terrain is already done you can take quick sneak peaks at small areas and rest assured that what you see is going to look the same in the final render.
Keep things simple is the order of the day. I've learned that the hard way after years of experimenting. Below is the principle of the first stage in world Machine.

I have turned the different part into macros so it looks deceptively simple, we will look into each of the components in future posts. The first part is Terrain Import, to handle areas and features that have been created using other tools.
The next stage is to blend in the different terrain "fractal recipes", Terrain 1, Terrain 2 and Terrain 3 in this example. Each of the macros can consists of a myriad combinations of fractals, erosion and filtering, and they are controlled by a Shapes Device. the Shape Device can either be inside the Terrain Macro or at the Combiner, both works, but can yield different results. They can be blended into the terrain using different combiner settings, like Add, Max, Subtract, Overlay or Screen, depending of how you want it to affect the final result. Next come the most complex bit, Lakes and Rivers. This will be a topic for several blog posts and videos, it is a deep topic!
The final bit is export and Guide Map overlay and the Overlay View device. To cover the Flanaess a dozen or more of these files with be needed, each with a dozen or so terrain types in them. This can create a virtually endless variety of natural looking terrain.
Another very important consideration is the vertical scale, how high are the tallest mountains, and since we are talking about Greyhawk how deep are the Rift Canyon. The Rift is a topic in itself, but I think it is too deep to cover in a the main terrain creation. The goal for the first stage of terrain creation is to cover all the landmass and the coastal waters. My reasoning is that some part of the land is below sea level so by including one you can include the other in the same setup, the coast below seal level is also close connected with the land and makes it a lot easier to cover how tidal and other changes to the ocean levels affect the coasts. My belief is that 22 km (13.6 miles) is enough to cover everything from coastal seabed, low-lying terrain to the tallest peaks. Below is an example terrain 6 x 6 miles with a few little islands and a peak rising to a bit over 6 miles up.

This was a first look at how I plan to do this. Next it is time to dive in to each of the components and start looking at the details.
Another year is coming to an end and it is the usual time to reflect and try to look forward, and this year it feels way more significant that almost any other year. 2020 have been, despite all the bad things that have affected the world, a year with lots of new possibilities. When your work is visualizing fantasy worlds, living in a world where almost all of us have been forced to stay home is not the worst that can happen.
This have been my most productive year with many small projects and three big ones that have taken shape at my desk this year, two for Kobold press. Southlands redo for 5E and a not yet announced project, both of them very large that I started on back in 2019. Going back to the Soutlands that I worked on 6 years ago was good kind of nostalgia, and I'm pleased how well the map has held up and now it is a bit better. The third big project was the Flanaess 576 CY map and its Atlas version. Originally planned to be a two or so month project, but it took over 6 months of hard work that turned out really well in the end. This project is also a bit nostalgic, it is the last major version of the map that got me into fantasy cartography. For over twenty years I've worked on the same map using almost the same tools either creating it or updating it. That era is now coming to a close, future Greyhawk mapping will be using a new set of tools and techniques.
When it comes to tools this have been a year of ambivalence, great promise but few actually useful progress. Gaea was a tool that looked very promising this spring, but development have fallen behind and the features I need for my work has yet to materialize. Thankfully World Machine has made a comeback and is now ready to be my go to tool for the new generation of Greyhawk maps. I just now on New Years Eve downloaded the final build of WM 4 and it has all the features I need. Using tiled builds we can cover up to half a million square miles at a times at 5 ft resolution. That is a bit too much in one go and make sure you can terrain that is varied enough, so I will do it in part not that big but still many tens of thousands of square miles.
My idea is the work on each drainage basin at a time to assure that rivers, lakes and its shore lines are matching properly. Splitting it up along the major rivers and mountain ranges where possible and try and patch over the errors using GIS mending tools as well as import the broken areas into World Machine and adjust the ugly bits. Trying to keep the problematic areas to lake and river bottoms and remote mountain peaks will hopefully make them less prominent. Real world cartographers phase the same challenges, so there are good tools for this and mapping a fantasy word gives us two advantages, it is possible to go back into and tweak the output and no one can say its not matching the real world.
The biggest hurdle in the "Next Gen Greyhawk Mapping" is water. Having lakes and rivers draining the landscape in a natural and believable way procedurally, instead of having to do all that manually. It is now possible to place major lakes and rivers, and having World Machine filling in all the fine details. This will save almost half the time it takes me to map an area, getting a faster computer will cut that time another half. This makes mapping the whole world become possible and the Flanaess going from a "over a decade project" to a more feasible five year project. Below is a bit of test terrain I made in a few minutes, combining all the watery elements with two types of terrain and proper erosion.

This test is only low resolution but it proves that all of the details needed can be both controlled and procedurally generated fast and reliable. I'm especially pleased of the water texture. This is just a quick sample using two colors, with an array of colors and textures it is going to look fantastic in high resolution. The Darlene map had a detail level of 30 miles, my current map has 1 mile, my goal with next will be 5 feet. The maps I have created for my Shield Lands Campaign have been a test run and proven it is possible and WM4 and a much more powerful computer will make it doable.

There are so many aspects to a project of this magnitude, and how you decide you will go about might be something you have to live with until you're finished. I've learned that the hard way, so this time I'm way more careful, maybe even too careful and trying to figuring out the best way to go about this. I've seen the Middle Earth project stumble and grind to half after several years of great and steady progress. I remembered Peter Jackson in an interview a year of so before the first LotR movies stating that "Now was the time to do it". That is how I feel about starting all over to try and visualize the World of Greyhawk in a way that I don't think any fantasy world has ever been so far. Now finally I have the tools, the experience and most importantly you guys to help me make this dream of mine come true. Thanks to your support I can now treat this as a part time job, pay for the tools and set aside time to work on this.
It will be a project with many phases and some of them need to be done in parallel, so many thing depend on each other. In order to create accurate terrain I need to know where the Flanaess is located on Oerth, so we need to have at least a rough working model of the planet. Terrain is directly linked to climate so we need to have a model for that as well with all its variety natural and fantastic. Data standards for all the information need to be established, keeping withing the laws of computer storage limits and in formats that can be used by most without expensive tools and a decade of computer graphics experience.
As aside quest I've been learning QGIS and just started with Unreal, both will play big part of this project. My goal is to use them both to produce and present, QGIS for traditional maps in print and digital. Unreal for a immersive 3D experience. There will be an overlap between the two and to make the raw data available for others to play with is key in this. I want to se many different version of WoG in the future using the data from this project as a base. I call it data since it will be a huge collection of images, heightmaps, masks, GIS shape files, various databases and more.
I want to create an immersive, inspiring and useful set of maps, data and even tools down the line to help DM's and players have more fun in Greyhawk. It might be technical and look boring and "computery" at times, but when you see a landscape you recognize as being somewhere in Greyhawk the feeling is magical. I hope you can share that feeling with me, it is a magical time we live in when you can use both words and fractals to bring fantasy to life, for me they are both very important for my gaming.
Together we can do it!
My Greyhawk Symbol Set have been around since the 1990's with some additions over the years, and they have for the most part done the job. But they could definitely do with an overhaul, some more than others. I created them using corel Draw back in the 1990's and my design skills were modest at best back then, and soon I will need SVG versions of them so it is a good time to take a thorough look and make them look a bit better.
First out is the basic settlement icons. From Metropolis to Dorf, with and without fortifications. The main thing I have adjusted is the fortification part of the symbols to make them symmetrical and removed some editing artifacts the old ones had. Especially the Village icon looked terrible and is now in line with its bigger siblings.
The old Thorp and Dorf symbols was some vague attempt of mine to make stylistic icons and they looked terrible. The new ones are attempt to get them in line with the rest and try and convey the meaning of a few small houses or a just the smallest of settlement. What do you guys think?
The relative size is a look at the size difference on the maps where they will all be present. Moving to GIS based maps mean that using some scales this will be the case, but on larger scales the smallest settlements will not present and on larger scale maps larger settlements will have a basic layout instead of a symbol, a first look at that is coming in a post soon.
My goal with the symbols have always been to try and keep the Greyhawk feel and looks from the Darlene map but expand and slightly simplify them to make them quick and easy to identify.
I hope you are all staying safe, and have as good of a holiday as the times permit. I'll take some time off to test out my new VR headset, but otherwise it is mapping on the agenda.
It will be a mixture of a lot of different things: a refresh of the Greyhawk symbols to make them ready for GIS next year. Finish the first part of my Shield Lands map. More 150% Flanaess maps. New heraldry for my campaign. Create a World Machine Template for Lendore Isles and future Greyhawk maps. Learn more about Fantasy Grounds and Unreal.
Thank you again for your support!
Printing the Flanaess map is very desirable but difficult to do, the whole map is way too big and the smallest labels are so small that only the highest quality prints are good enough. What to do to make prints easier?
How about making everything 150% the size and cut it into a printable size of 24x36 inch pieces. The first two are ready, centered on Saltmarch - Gradsul

and centered around Greyhawk.

Both comes in full quality 200 MB PDF's to print well, with all labels and heraldry is vector. I'll try and cover interesting areas rather than having a grid coverage of the whole Flanaess. Reach out to me if there are an particular area you want to see.
It takes me about an hour to create each of them so I'll have a new one ready every few days. You can get them here: https://bit.ly/GH-Flanaess-576CY-FOLDER
I have now started my campaign and is back in the DM saddle again after a hiatus for three years and here is a closer look at the starting point for my campaign, the village of Auldet.
First a series of terrain shots, looking at how the village is placed in the countryside.


And the top down area map.
And a elevation overview

And a closer look at the village

Map Key:
1. Auldet Main Keep the "Old House". The oldest building in the village and now the seat of power for the Iuz priests, "The Eldermen". Senior among the Iuzian priests are currently Kirshenk.
2. Stables
3. Half Roof Inn, the once rather impressive in is now half ruined. It lost most of its western part when the Iuzians attacked. Now is as serves Auldet’s watering hole and gathering place. It has been restored to usable standard the last two years, but a major part is still only a ruin. No one seems to remember what the original name of the place was. It used to have a stable and a large part of its western wing are now a ruin, and a makeshift wall and roof covers the hole.

4. Old Brewery. It is also in a bad shape since the stable that used to be between the brewery and the Inn totally collapsed. Albetin the Inn keeper have managed to start a limited production of mead and cheap ale.
5. This house use to house the laborers of the inn and the brewery and is now mostly empty
6. The Mill. It used to be a small windmill on top but that is now history and the millstones are now turned by muscle power human or beast.
7. The keeper's house. This house was once the office for the servant collecting fees and taxes from travelers and villagers worked and lived. It is situated at a central location to make it easy too see what is going on. Now its mainly empty, the Iuzians am more keen of controlling from the keeps and the walls.
9. A woman named Leneda used to live here. She was was hateful and difficult to deal with and most villages made sure to stay away from her. No one have seen her since last summer, the house now sits dark and silent. It's a small cottage with a sturdy door that was probably originally build to store things in.
10. This used to be the communal grain storage, and is sturdy stone building with a strong door and brick roof to prevent fires. It now seems to be unused and the door remains locked.
11. Execution Tree
12. Stable hands quarters. A small simple house that used to be the home of the stable master and his family. Since the Iuz take over it now houses 5 grim men that follows Kirshenk every command, but are not civilized enough to be allowed the luxury of living in the main keep. Their main task is village guard duty, especially at night.
13. The Odven family works as servants in the Keep.
14. Vertz is grumpy loner who works as a tracker for the Eldermans in the Keep lives here.
15. Southern Gatehouse
16. Herzina is the villages best baker and cook, with Auldets second best oven after the inn, which she use to bake bread and other food for anyone who supplies the ingredients and firewood. In exchange she takes a little bit of the food as payment.
17. Lota and Socel are the most successful goat farmers in Auldet, but pay a high price both direct confiscation by the Eldermen and by taxation of what little profit they make on selling to Albetin, the Innkeeper or Ortefus, the Peddler . They just given birth a daughter and are seen as a hope by many in the village. Having a daughter have given them some slack by Kirshenk who wants the little girl to grow up and give him more inhabitants to rule over.
18. Gellian’s family lived here until recently. They was raising ducks and half the house was dedicated to the dusks and a pig and a few other animals. Gellian caught Hinnas killing and stealing and when he tried to stop Hinnas a fight broke up and Gellian got killed. For this Kirshenk condemned the whole family to be killed. Their bodies where recently taken down from the Execution Tree. The house have been empty since.
19. Mid Keep or the Guardhouse. It is the second biggest keep and used to house a some of the soldiers but nowadays sits looked and empty for the most part.
20. Ortin and his partner Nysenda lives here. They are a struggling couple neither of them being the sharpest tools in the shed. They have had four kids the last 6 years but only 2 of them have survived. Kirshenk use them for hard labour and menial tasks as much as possible. Now their kids are old enough to help means that they are even more useful to Kirshenk. When they are too hungry to work Kirshenk let them eat the cheapest food for free at the Inn. other neighbours help them at times to. It is a grim existence but they are trying their best to cope.
21. Fisdis and Wencia lives here with their son Torris. They are fairly successful farmers being disciplined and smart enough to pay what is needed to the eldermen to stay out of major trouble.
22. Nivandren Tannary
23. The Oak Farm.
24. Western Keep
25. Raude who lives here is a proud mother of 4 kids from 1 to 8 which gives the village life. Who are the father, or fathers, is much very much the talk of the village. Most agree that it must be the Eldermen which means that no one dare to ask, and she is seen as a woman on the loose. She is friendly but more than a bit direct, and is often willing to lend a hand when work is needed without asking too much.
26. The Jicksan’s rent this house from Albetin, the Innkeeper and are jack of all trades family of the village Jicksan is a clever repair man and handyman helping out with maintenance work in between tending to the animals and helping out in the fields. Adnien is trying her best to be of help both at home and at the Inn cooking cleaning and doing laundry at the pond.
27. This hose have been deserted for some time and is no longer in a good shape. It had lots of marine things including a steering wheel on the outside wall, giving it the nickname the captains house.
28. Rivergate
29. Wagoner's house. This house belonged to a family who repaired carts and wagons. The lack of travelers after the Iuz take over doomed the business and the hose have been unused for over a decade.
30. Rounel and Gecinda lives here. They are an aging couple in their 40’s who fled from Axeport, drifted around the country side a few years and survived with their goats and a few other animals. They gave their two horses to the previous senior Elderman Shiglik to have the house and the right to settle.
31. An old Oak still standing outside Auldet’s half crumbled walls. The the Iuzian rulers tried to burn it down some years ago, but it quickly came back again and since then they have left it in relative peace and nowadays stays away from it.
The area maps are almost done, and a good test for a new generation Greyhawk maps. The village map and the map of the inn are quick sketches that I used to create on my tiles during game sessions and then take a picture of so save for future reference. Now I have taken that quick sketching to Photoshop, with a so and so result. The village and Inn maps are about two hours of work to create, a time that will be significantly less going forward, now that I have a template to reuse. When you ran a sandbox like me you have to map pretty much every settlement to this detail, including some of the building interiors as well, so you can't spend too much time refining things. For this campaign I probably have to do over twenty settlement maps from villages to cities in the next six months or so, alongside the 1000 or so square miles of countryside.
More posts are coming tomorrow, thank all you so much for making this possible!